SURPRISE – 21st birthday

So, my sister just celebrated her 21st birthday some time in mid September! I wanted to do a guest book/scrapbook kind of thing for her initially since I’ve done it for most of my close pals on their 21st. However she decided to have a small intimate dinner with the family and I thought it would be better if what I did could include her friends. So, when I stumbled upon this blog post from Oh Happy Day!, I knew I had to do it!

IMG_2642

IMG_2640

I contacted her friends about a month before, hoping to get sufficient response. I wanted it to be a surprise, but was worried it would slip out (which has happened tons of times previously), so I was really glad that she had no clue about it! ((: Though there were some hiccups with the balloons, I would say, overall, it would be considered a successful surprise and have to thank all her friends who participate and contributed to it!

Some tips that I have:

  1. It wasn’t easy to find small envelops that were sold individually, so it might be more convenient to just make them yourself.
  2. Buying envelops/balloons individually isn’t cheap at all. I’m going to reuse the envelops for my Christmas cards! HAHA! As for the balloons, well, if you aren’t so picky about the colors, it would save you some money to simply buy a multi color packet and use it.
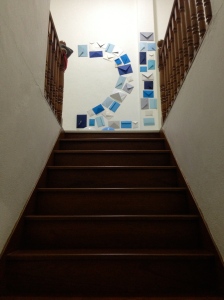
  3. Rather than going straight onto the wall to paste the envelops, it helped immensely to plan it out on the floor and take a picture of it as a guide.

And what is a birthday without a cake!

IMG_9816

We got the cake customised by Ristorante Da Valentino. Check out their Facebook for more of their pretty cake creations!

Hope this post has given you some inspiration for what you can do for someone’s birthday! ((:

Card making session #4

I have 2 cards to share today. I’ve used scrap paper that I’ve kept from previous projects to create them. Hope you will like them!

IMG_1015

First up, we have a really colorful birthday card! I sifted through my pile of scrap papers and managed to find these papers with dots of varying patterns and colors. So I decided to use them. The tricky part, I thought, was to find the angle and decide which color to overlap which, which to go underneath, etc. After all the adjustments and rearrangements, I managed to come up with this. I pasted flowers from Fancy Pants: Be You collection. And the happy birthday sticker is from crate paper.

IMG_1028

This next card is a simple LOVE card! I’m sure you’ve seen many pictures/advertisements with 4-lettered words arranged this way. That’s actually where I got my ‘inspiration’ from. So I got 4 pieces of flowery papers, cut to a rectangular shape and pasted them 2×2. The fabric chipboard is from American Crafts Thickers: Doll. To complete the card, I used my corner punch to create the round edges.

So that’s all for the day!

Card making session

So during the exams period, when I was suppose to have intensive revision sessions, I took small breaks on the Internet and got many ideas for card making. And finally, I found the time to sit down and make those ideas into reality.

This is a Fathers’ Day card. I’ve been seeing a lot of other crafters using this flag concept for their cards and decided to give it a go!

IMG_1004

I used the triangles from lilybeedesign and the alphabet stickers are from doodlebug design inc. and October Afternoon. To complete the look, I used a black marker to add the doted line across ‘flags’.

Another card I’ve made is a birthday one.

IMG_1018

For this card, I used a long-ish concept with kraft paper and layered it with a white cardstock. I first tied the ribbon using a purple string, before adhering the white cardstock to the kraft one. The flower attached is from Little Yellow Bicycle and the ‘Happy Birthday’ sticker is from crate paper.

And the last card that I would like to share today would be the one that I intend to give to my father for Fathers’ Day!

IMG_1007

I cut out the banner shapes from some left over papers I’ve used for previous crafts and chose buttons with similar colors to match. To make the ribbon, I tied a double knot first, and unraveled all the strings that made the twine. Had to try a couple of times, and in this case, there were too many white strings after unraveling them, so I ended up cutting them off. So, to add a sentiment, I got the ‘I love you’ sticker from Little Yellow Bicycle. And finally, I adhered it onto a dark blue cardstock to make it more ‘manly’ for my daddy.

So that’s all I’ve got for today! Will add the other cards that I’ve made soon. ((: